
What is the best way to line a baseball field? The best way to line a baseball field perfectly involves meticulous planning, the right tools, and a systematic approach to ensure accuracy and longevity of the markings.
Lining a baseball field might seem straightforward, but achieving professional-level precision requires attention to detail and a solid understanding of the sport’s dimensions. Whether you’re preparing a Little League park or a high school diamond, crisp, accurate lines are crucial for fair play and a visually appealing playing surface. This guide will walk you through the entire process, from initial measurements to the final chalk application, ensuring your baseball field layout is second to none.
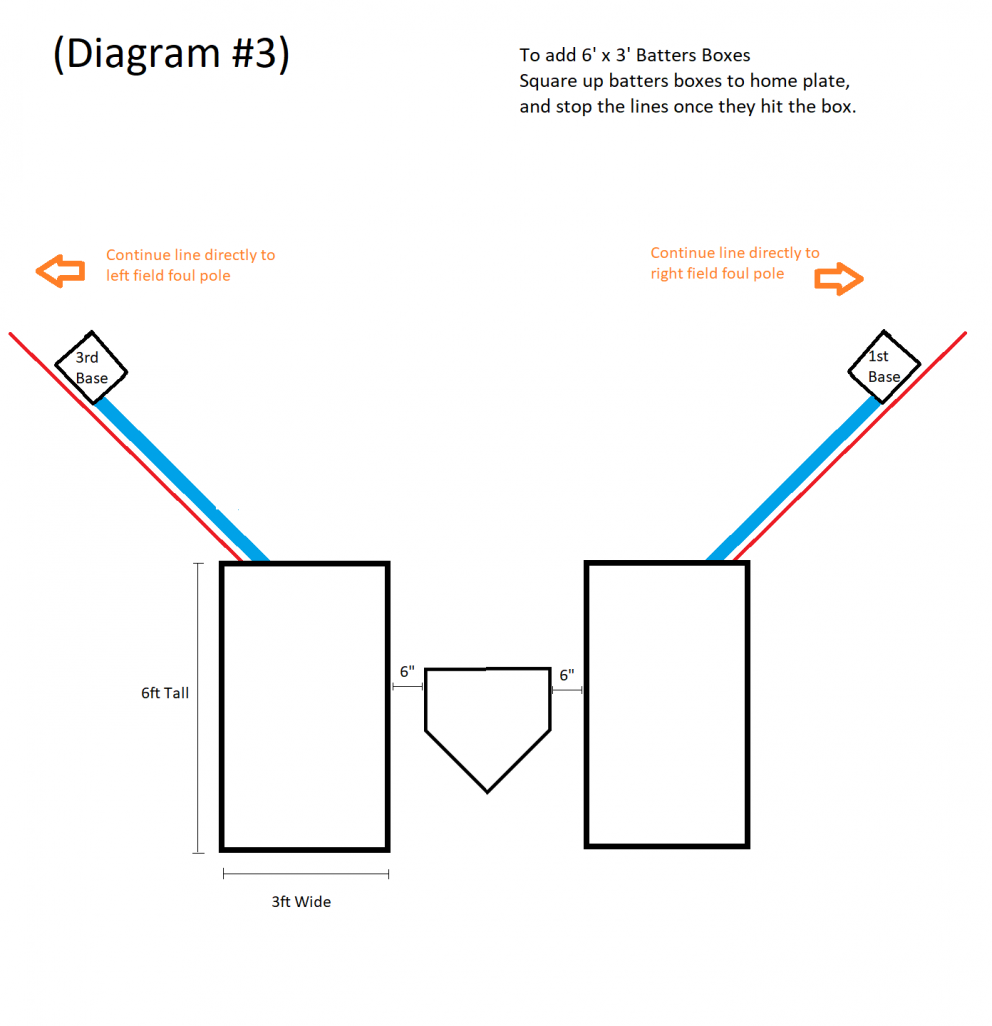
Image Source: foxvalleypaint.com
Essential Tools and Materials for Baseball Field Lining
Before you start, gather all the necessary equipment. Having everything ready will make the baseball field chalking process much smoother and more efficient.
Equipment Checklist:
- Measuring Tapes: A long, durable measuring tape (at least 100 feet) is essential for accurate outfield and baseline measurements. A shorter tape measure is useful for smaller details like the batter’s box.
- Stakes and String: Robust stakes (metal or sturdy wood) and strong string or twine are vital for creating straight guide lines.
- String Line Level: To ensure your guide lines are perfectly level, a string line level is indispensable.
- Line Striper Machine: For applying chalk or paint, a specialized line striper is the most efficient tool. They come in various sizes, from walk-behind models to larger, self-propelled units.
- Chalk or Field Marking Paint:
- Baseball Field Chalk: The most common and traditional material. It’s eco-friendly, easy to use, and relatively inexpensive. Look for high-quality, finely ground chalk for the best results.
- Field Marking Paint: More durable and weather-resistant than chalk, paint offers longer-lasting lines. It’s available in aerosol cans for smaller jobs or bulk containers for stripers. For bases and other high-traffic areas, paint is often preferred.
- Spray Bottle with Water: For pre-wetting the ground before chalk application, which helps the chalk adhere better and creates sharper lines.
- Gloves and Safety Glasses: Protect yourself during the marking baseball field lines process.
- Calculator and Measuring Tools: For precise calculations of distances and angles.
Pre-Lining: Preparation is Key
A well-prepared field ensures your lines are accurate and last longer. This phase is as important as the actual application of chalk or paint.
Step 1: Field Inspection and Layout Planning
Before any marking begins, thoroughly inspect the existing field. Note any worn areas, drainage issues, or existing markings that might need to be removed or re-established. Develop a clear plan for your lines, referencing official baseball or softball field dimensions.
Key considerations for the baseball field layout:
- League Specifications: Always adhere to the specific dimensions mandated by the league or governing body (e.g., Little League, High School, NCAA). These can vary significantly.
- Existing Infrastructure: Account for the location of dugouts, fences, backstops, and other permanent structures.
- Drainage: Ensure your lines don’t interfere with natural drainage patterns.
Step 2: Clearing and Cleaning the Field
Remove any debris, leaves, grass clippings, or old chalk lines from the areas where new lines will be applied. A leaf blower or a stiff broom can be very effective here. A clean surface allows the chalk or paint to adhere properly.
Step 3: Establishing Reference Points
Accurate baseball field chalking starts with establishing a solid reference point. The home plate is typically the starting point for most measurements.
- Home Plate: Ensure the home plate is correctly positioned. It serves as the anchor for the entire field.
- First and Third Base Lines: These are critical for defining fair territory.
Marking the Baseline and Foul Lines
The foul lines are arguably the most important lines on the field. They clearly delineate fair and foul territory, and their accuracy is paramount.
Step 4: Setting Up the First Baseline
This is where the string and stakes come into play.
- Stake Placement: Drive a stake firmly into the ground just outside the corner of home plate where the first base line begins.
- Measure to First Base: Measure the specified distance from the apex of home plate to the front edge of the first base marker. Drive another stake at this point, extending the line beyond the base.
- Stretch the String: Tie a string tightly between these two stakes.
- Level the String: Attach a string line level to the string and adjust the string until it is perfectly level. This ensures your foul line is straight and not dipping or rising.
- Mark the Line: Use your line striper to apply chalk or paint precisely along the string. Start at one end and move the striper along the string, maintaining consistent pressure and speed.
Step 5: Setting Up the Third Baseline
Repeat the process for the third base line, starting from the opposite corner of home plate and measuring to the third base marker.
Step 6: Outfield Foul Lines
For the outfield foul lines, you’ll need to extend the baseline measurements.
- Measure to the Outfield Boundary: Measure the standard distance from first base to the outfield foul pole. Drive a stake at this point.
- Measure to the Center Field Boundary: Measure the standard distance from the outfield foul pole to the corner where the foul line meets the outfield fence or boundary. Drive another stake.
- Stretch and Level: Stretch a string between the stake at first base (or a point directly in line with the first base foul line) and the outfield boundary stake. Ensure it’s level.
- Chalk/Paint: Apply chalk or paint along the string. Repeat for the third base side.
Pro Tip: For exceptionally long lines, you might need intermediate stakes to keep the string taut and prevent sagging. Ensure these intermediate stakes are also placed in line with your main stakes.
Marking the Infield and Key Areas
With the foul lines established, you can move on to marking the rest of the infield, including the baselines within the infield and the crucial batter’s boxes and pitcher’s mound. This is often referred to as chalking baseball infield.
Step 7: Infield Baselines
These lines guide players to the bases.
- First Base Line: Measure from the front corner of first base to the corresponding point on the outfield foul line. Stretch and level a string, then apply your marking.
- Third Base Line: Repeat for the third base line, measuring from the third base marker to the outfield foul line.
Step 8: Batters’ Boxes
The baseball batter’s box is a critical area for the hitter.
- Home Plate Alignment: The batter’s box is centered on home plate. The front of the box should be aligned with the front edge of home plate.
- Dimensions: Standard dimensions are usually 6 feet long and 4 feet wide. The lines are typically 2 inches wide.
- Marking: Use a shorter measuring tape and potentially a T-square to ensure right angles. You can either lay out the box with stakes and string or use a template. Apply chalk or paint carefully. Remember to mark boxes for both the right-handed and left-handed batter.
Step 9: Catcher’s Box
While less strictly defined than the batter’s box, a catcher’s box is often marked behind home plate.
- Dimensions: Typically extends about 8 feet behind home plate and is about 6 feet wide.
- Marking: Similar to the batter’s box, use measurement and straight edges for accuracy.
Step 10: Pitcher’s Mound
The baseball pitcher’s mound requires precise measurements and careful marking.
- Home Plate to Pitcher’s Rubber: The distance from the back tip of home plate to the front of the pitcher’s rubber is critical (e.g., 60 feet 6 inches for professional baseball).
- Mound Dimensions: The pitcher’s mound itself is circular, with the rubber placed on the centerline. The diameter of the mound is typically 18 feet. The front edge of the rubber is typically 10 inches above home plate.
- Marking the Circle: You can create a circle using a string attached to a central stake and a marking tool. Measure out the 9-foot radius from the center and mark the circumference.
- Pitching Rubber: While not chalked, ensure the pitcher’s rubber is correctly positioned and securely anchored.
Step 11: Coach’s Boxes
These boxes are located along the first and third baselines.
- Location: Typically situated outside the baseline, a few feet from the foul line.
- Dimensions: Usually a rectangle, about 5 feet by 10 feet.
- Marking: Measure and mark these boxes clearly.
Step 12: On-Deck Circles
Located near the dugouts for batters warming up.
- Dimensions: Usually a 5-foot diameter circle.
- Marking: Similar to the pitcher’s mound circle, use a string and marking tool.
Field Marking Paint vs. Chalk: Making the Choice
The choice between field marking paint and chalk depends on your needs, budget, and desired durability.
| Feature | Baseball Field Chalk | Field Marking Paint |
|---|---|---|
| Durability | Less durable; washes away with rain/heavy dew. | More durable; resists weather better for longer periods. |
| Application | Easier to apply, less messy. | Can be more complex, requires cleaning of equipment. |
| Cost | Generally less expensive per application. | Higher initial cost but can be more economical over time. |
| Visibility | Good, but can fade more quickly. | Excellent; stays bright for extended periods. |
| Environmental | Eco-friendly, non-toxic. | Varies; check labels for eco-friendly options. |
| Best For | Frequent re-lining, temporary fields, budget-conscious. | High-traffic fields, long-lasting lines, tournaments. |
For lining softball field or baseball fields, consider the frequency of games and practice. For a field that sees daily use, field marking paint might be a better long-term investment. However, for fields that are only used on weekends, traditional chalk is often sufficient.
Advanced Techniques and Maintenance
Maintaining the lines is as important as the initial marking for ongoing baseball field maintenance.
Step 13: Applying Multiple Coats for Sharpness
For the sharpest lines, especially with chalk, applying a second thin coat after the first has dried slightly can enhance opacity and definition. Ensure your line striper is calibrated for a consistent flow.
Step 14: Using Different Marking Materials
Consider using field marking paint for high-traffic areas like the batter’s boxes and the area around home plate, as these areas wear down quickly. Chalk can be used for the longer foul lines and outfield boundaries.
Step 15: Re-marking and Touch-ups
Regularly inspect the field for worn or faded lines. Touch up as needed, particularly after rain or heavy use. A quick once-over with a line striper can refresh the look and ensure continued playability.
Step 16: Storage and Cleaning of Equipment
Properly clean your line striper machine after each use, especially if using paint. Flush the system thoroughly with water or the recommended cleaning agent. Store stakes, strings, and measuring tapes in a dry place to prevent rust and damage.
Common Pitfalls to Avoid
Even with the best intentions, mistakes can happen. Here are some common issues and how to prevent them:
- Inaccurate Measurements: Double-check all measurements before applying chalk or paint. Use a reliable measuring tape and ensure it’s not stretched or damaged.
- Sagging Strings: Use good quality string and stakes, and keep the string taut. Employ intermediate stakes for long runs if necessary.
- Uneven Application: Ensure your line striper is properly adjusted for consistent chalk/paint flow. Avoid stopping and starting abruptly.
- Marking on Wet Ground: While a slightly damp surface helps chalk adhere, excessively wet ground can cause chalk to wash away or create muddy lines. Wait for optimal conditions.
- Ignoring League Standards: Always verify and adhere to the specific dimensions required by the league or tournament organizers.
Frequently Asked Questions (FAQ)
Q1: How often should I re-line a baseball field?
A1: This depends heavily on usage and weather. For fields with heavy daily use, you might need to re-line every few weeks. For lighter use, once a month or before major tournaments might suffice. Chalk lines will need more frequent touch-ups than paint.
Q2: What is the best type of chalk for baseball fields?
A2: High-quality, finely ground calcium carbonate (often called “baseball chalk”) is ideal. It provides bright white lines that adhere well to the soil. Avoid coarse or impure chalk.
Q3: Can I use household paint for marking baseball fields?
A3: It’s generally not recommended. Household paints are not designed for outdoor field conditions and can fade, peel, or be toxic to turf. Use specifically designed field marking paints or chalk.
Q4: How do I remove old chalk lines?
A4: Mild rain will eventually wash away chalk. For quicker removal, you can lightly rake the area or use a stiff broom. For stubborn old paint lines, specific field cleaners might be necessary.
Q5: What are the standard dimensions for a Little League baseball field?
A5: Little League fields vary by age division. For example, a Minor League field might have 60-foot base paths and a 46-foot pitching distance, while a Major League field might be closer to 70-90 feet for base paths and 50 feet for pitching distance. Always check the official Little League rulebook for precise dimensions for the specific age group.
Q6: How wide should the foul lines and other baseball field lines be?
A6: Typically, foul lines and baseline markings are 2 to 4 inches wide. Batter’s boxes are often marked with 2-inch lines. The pitcher’s mound circle is usually larger in diameter.
By following these steps, you can ensure your baseball field layout is accurate, professional, and ready for any game. Proper baseball field maintenance, including regular line work, contributes significantly to the safety and enjoyment of the sport for players of all levels.