
What is the best way to line a baseball field? The best way to line a baseball field involves precision, the right tools, and consistent maintenance practices. This guide will walk you through the essential steps and offer professional tips to ensure your field is game-ready and looks its best.
Lining a baseball field is more than just drawing lines; it’s about defining the boundaries of play, ensuring fairness, and presenting a professional appearance. Whether you’re maintaining a Little League park or a collegiate facility, the principles remain the same: accuracy and attention to detail. Proper baseball field maintenance is crucial for player safety and the overall enjoyment of the game.
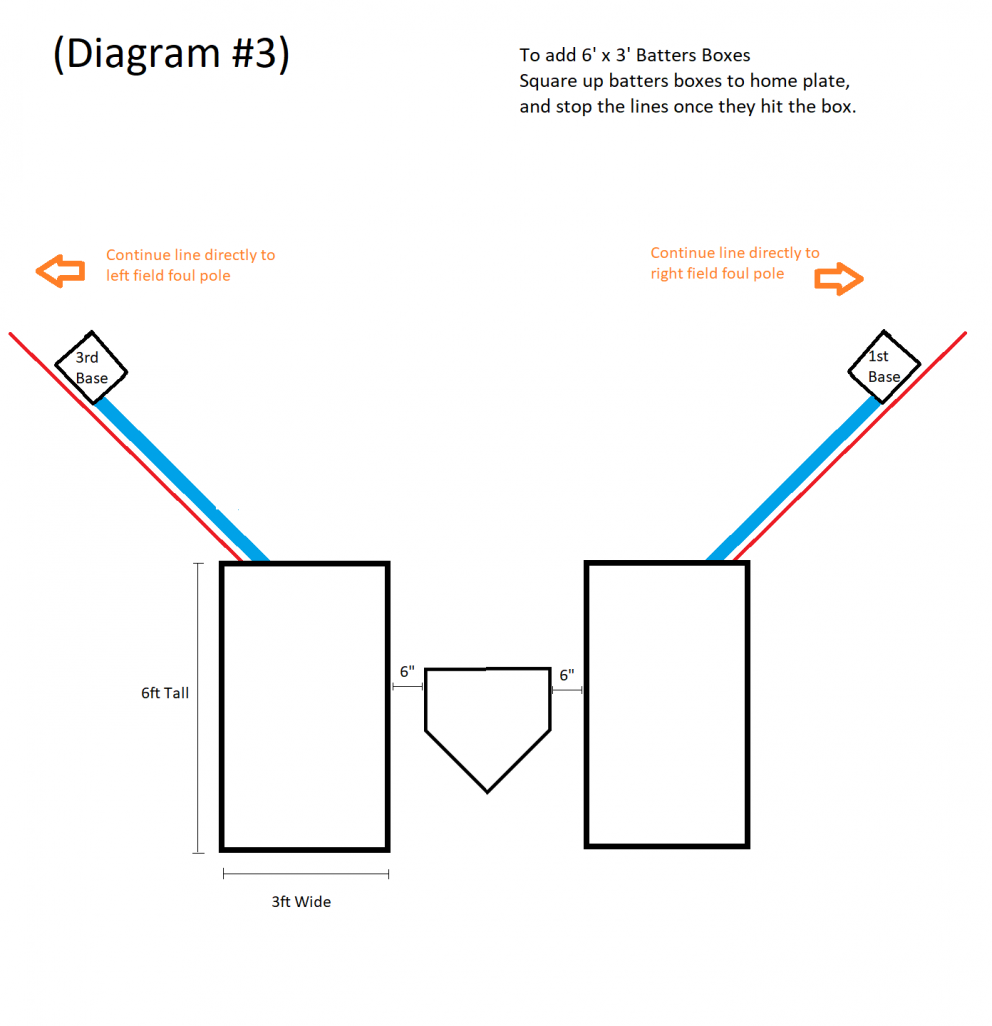
Image Source: foxvalleypaint.com
Preparing Your Baseball Field for Lining
Before you even think about chalking, your field needs a solid foundation. This involves ensuring the infield dirt is in good condition and the outfield grass is properly managed.
Infield Dirt Preparation
The infield dirt is the heart of the baseball field. Its condition significantly impacts playability and player safety.
Key Infield Dirt Practices:
- Raking and Screening: Regularly rake the infield to break up clumps and remove debris. For a smoother playing surface, consider using a screen rake. This helps to create an even texture.
- Moisture Control: The right moisture level in the infield mix is critical. Too dry, and it becomes dusty and prone to divots. Too wet, and it can become muddy and sticky. Use a hose with a spray nozzle or a sprinkler system to lightly water the infield if it’s too dry.
- Aeration: Periodically aerating the infield helps improve drainage and allows air to penetrate the soil. This is especially important after heavy use or rain.
- Top Dressing: In areas with heavy wear, like the home plate area and the batter’s box, adding a thin layer of fresh infield mix can help maintain a consistent playing surface and prevent the underlying soil from becoming exposed.
Outfield Grass Management
The outfield grass needs to be healthy, well-mowed, and free of weeds.
Outfield Grass Essentials:
- Mowing: Maintain a consistent mowing height. For most baseball fields, a height of 1.5 to 2.5 inches is ideal.
- Watering: Ensure the outfield receives adequate water, especially during dry periods. Deep, infrequent watering encourages strong root growth.
- Fertilizing: Follow a regular fertilization schedule based on soil test results and the type of grass you have.
- Aeration and Dethatching: These practices improve air circulation and water penetration, leading to healthier turf.
The Art of Chalking: A Step-by-Step Guide
Chalking lines on a baseball field is a skill that combines accuracy with the right techniques. The goal is to create crisp, visible lines that last throughout the game.
Essential Tools for Chalking
Having the right equipment makes the job much easier and the results much better.
Must-Have Chalking Tools:
- Field Liner: This is the primary tool for applying chalk. There are various types, from simple push-behind models to more sophisticated machines with adjustable line widths.
- Marking Paint/Chalk: Use high-quality baseball field chalk specifically designed for sports fields. It’s typically a powdered lime product. Ensure it’s finely ground for smooth application.
- Measuring Tape: A long, sturdy measuring tape (at least 100 feet) is essential for accurate measurements.
- Stakes and String: For establishing straight lines, especially foul lines, stakes and a taut string are invaluable.
- Wheelbarrow: Useful for transporting chalk from storage to the liner.
- Gloves and Eye Protection: Always wear protective gear when handling chalk.
Lining the Foul Lines
The foul lines are arguably the most critical lines on the field. They define fair territory and foul territory, impacting every batted ball.
Steps for Lining Foul Lines:
-
Establish the Foul Pole Base:
- Locate the exact point where the foul pole meets the outfield fence. This is your starting point.
- Drive a sturdy stake firmly into the ground at this point.
-
Measure and Mark the Baseline:
- Unroll your measuring tape from the foul pole stake.
- Measure 127 feet, 3 3/8 inches (the distance from home plate to the foul pole for a standard 90-foot diamond). Mark this point on the ground with a stake. This is the point where the foul line intersects with the outfield fence.
- For a 60-foot diamond (Little League), the distance is 75 feet.
-
Create a Straight Line with String:
- Now, measure 90 feet (or 60 feet for a smaller diamond) along the baseline from home plate. Mark this point on the ground with another stake. This stake should be directly in line with the first stake at the foul pole.
- Tie your string tightly between the stake at the foul pole and the stake you just placed on the baseline. Ensure the string is taut and runs perfectly straight.
-
Apply Chalk Along the String:
- Fill your field liner with chalk.
- Walk the liner along the taut string, ensuring the chalk is applied evenly and creates a clean, visible line. For the initial lining, you might want to make two passes.
- Pro Tip: Lightly misting the ground with water before chalking can help the chalk adhere better, especially on dry days.
-
Repeat for the Other Foul Line:
- Repeat the entire process for the second foul line, starting from the other foul pole and measuring 90 feet (or 60 feet) along the baseline. The angle between the two foul lines at home plate should be a perfect 90-degree angle.
Defining the Batter’s Box and Catcher’s Box
These areas are crucial for the batter and catcher and need precise dimensions.
Batter’s Box and Catcher’s Box Dimensions:
- Batter’s Box:
- Starts 6 inches from the back of home plate.
- Measures 4 feet wide (parallel to the plate).
- Extends 6 feet back from the front edge of home plate.
- The area in front of home plate is 6 feet by 3 feet.
- Catcher’s Box:
- Starts at the rear point of the batter’s box.
- Extends 10 feet back from the front edge of home plate.
- Is 1 foot wider than the batter’s box on each side (so 6 feet wide).
Lining the Batter’s and Catcher’s Boxes:
- Home Plate Alignment: Ensure home plate is firmly set in its correct position. The edges of the batter’s box should be equidistant from the sides of home plate.
- Using Stakes and String (Optional but Recommended): For the most precise lines, you can use stakes and string to mark the outer boundaries of the batter’s box and catcher’s box. Measure out the 6-foot length and 4-foot width (for the batter’s box) and 10-foot length and 6-foot width (for the catcher’s box).
- Chalking: Use your field liner or a hand-held chalk applicator to create the box lines around home plate. Focus on creating clean, straight edges.
The Pitcher’s Mound: A Critical Component
The pitcher’s mound is a raised area that requires specific dimensions and careful lining.
Pitcher’s Mound Dimensions:
- Diameter: The official rules state the pitcher’s mound should be 18 feet in diameter.
- Pitching Rubber: A white rubber slab, 24 inches long, 6 inches wide, and 2 inches thick, is embedded flush with the surface of the mound. The front edge of the rubber is 60 feet 6 inches from the rear point of home plate for professional and college baseball. Little League mounds are typically closer, around 46 feet.
Lining the Pitcher’s Mound:
- Establish the Center: Find the exact center of the mound.
- Mark the Diameter: Use a measuring tape to mark out the 18-foot diameter. You can do this by measuring 9 feet in every direction from the center point.
- Create the Circle: You can use a large string and a stake at the center, or simply use a marking pole or the field liner to draw a circular line around the mound.
- Line the Pitching Rubber: Use chalk to clearly outline the front edge of the pitching rubber.
Other Essential Lines
Beyond the primary boundaries, other lines contribute to the field’s functionality.
Key Additional Lines:
- On-Deck Circles: Typically 5 feet in diameter, located near each dugout.
- Coach’s Boxes: Located 90 feet from first and third base, extending back from the foul line. They are usually 3 feet wide and 5 feet deep.
- Infield Arc (or Radius): A marked arc from the front edge of home plate to the foul lines at a specific distance (e.g., 35 feet for a 60-foot diamond, 45 feet for a 70-foot diamond, 50 feet for a 90-foot diamond). This line is important for certain rules regarding infielders’ positioning.
Lining These Areas:
- On-Deck Circles: Use a measuring tape to mark a 5-foot diameter circle. You can use a flexible hose or string as a guide for chalking.
- Coach’s Boxes: Measure 90 feet from the base along the foul line and then extend back 5 feet. Mark the lines using your measuring tape and string.
- Infield Arc: For the infield arc, it’s best to use a string attached to a stake at the appropriate point on the foul line and draw the arc.
Using Field Conditioner for Optimal Results
While chalk is the primary lining material, field conditioner plays a vital role in creating a superior playing surface, especially in the infield dirt.
What is Field Conditioner?
Field conditioner is a finely screened material, often crushed stone, brick, or a blend of specific minerals. It’s designed to improve the texture, drainage, and moisture retention of the infield dirt.
Benefits of Field Conditioner:
- Improved Drainage: It helps water pass through the soil more effectively, reducing mud and standing water.
- Dust Control: It binds with the soil, reducing dust kicked up by players and equipment.
- Firm Playing Surface: It creates a more compact and stable surface, reducing the risk of divots and providing better footing.
- Consistent Bounce: A well-conditioned infield offers a more predictable ball bounce.
Applying Field Conditioner:
- Timing: Apply conditioner after heavy rain or when the infield is dry and compacted. It can also be worked into the soil as part of regular maintenance.
- Application Method: Spread the conditioner evenly over the infield dirt using a shovel, rake, or a specialized spreader.
- Incorporation: Rake the conditioner into the top 1-2 inches of the existing infield soil. A rototiller can also be used for deeper incorporation, but be mindful not to over-till, which can break down the soil structure.
- Watering and Compacting: Lightly water the area and then compact it. This can be done with a roller or by dragging the infield with a heavy tarp or specialized infield drag.
Maintaining Your Lined Field
Lining is only part of the equation. Ongoing maintenance is key to keeping your field in top condition.
Regular Touch-Ups and Repairs
- Foot Traffic: High-traffic areas like the batter’s box, home plate area, and the path to the pitcher’s mound will show wear quickly. Regularly inspect these areas and touch up chalk lines as needed.
- Weather: Rain can wash away chalk lines. Be prepared to re-line after significant rainfall.
- Wear and Tear: Dragging the infield, batting practice, and games will inevitably affect the lines. Regular checks are essential.
Infield Dragging Techniques
Using an infield drag is a fundamental aspect of baseball field maintenance.
Best Practices for Infield Dragging:
- Timing: Drag the infield when the dirt is slightly damp, but not wet.
- Direction: Drag in a circular pattern around the bases and home plate, working your way outwards. Avoid dragging in straight lines along the foul lines, as this can create ruts.
- Depth: Adjust the drag depth to break up any compacted layers and smooth the surface.
- Finishing: After dragging, use a broom or rake to smooth out any remaining marks and create a finished look.
Seasonal Field Maintenance
Beyond daily and weekly tasks, consider seasonal maintenance for long-term field health.
Seasonal Tasks:
- Spring: Deep tilling, adding top dressing, and ensuring proper drainage systems are clear.
- Summer: Focus on moisture control, regular mowing, and consistent infield conditioning.
- Fall: Aeration, overseeding (if necessary), and preparing the field for winter.
- Winter: Protect the field from the elements if possible, especially the infield dirt and pitcher’s mound.
Frequently Asked Questions (FAQ)
Here are some common questions people have about lining a baseball field:
Q1: How often should I re-line a baseball field?
A1: The frequency of re-lining depends on usage and weather. For a well-used field, you might need to touch up foul lines and the batter’s box every few days. Major re-lining might be necessary weekly or after significant rain.
Q2: Can I use regular chalk or house paint for lining?
A2: No, it’s highly recommended to use specialized baseball field chalk or paint. Regular chalk can be dusty and wash away easily. House paint can be harmful to the grass and create an uneven surface. Field conditioners and specialized chalks are designed for durability and safety.
Q3: What is the best chalk for lining a baseball field?
A3: High-quality, finely ground powdered lime is the standard. Look for products specifically marketed as “baseball field chalk” or “athletic field chalk.” Some products may contain additives for better adhesion and durability.
Q4: How do I ensure my lines are straight?
A4: The most effective way to ensure straight lines is to use stakes and a taut string as a guide for chalking lines, especially for the foul lines.
Q5: How do I deal with a muddy infield after rain?
A5: Good drainage is key. Ensure your infield mix contains adequate amounts of sand and a good field conditioner. After moderate rain, allow the infield to dry slightly before dragging. For very wet conditions, you might need to cover high-traffic areas or use drying agents sparingly.
Q6: What are the standard dimensions for a Little League baseball field?
A6: For Little League (ages 9-12), the pitching distance is 46 feet, and the bases are 60 feet apart. The foul lines extend 75 feet from home plate to the outfield fence.
Q7: How do I repair a damaged pitcher’s mound?
A7: Repairing a pitcher’s mound often involves adding a specialized mound clay or a mixture of infield mix and clay. Ensure the area is well-compacted and then re-shape it to the correct contour.
Q8: What is the purpose of the infield arc?
A8: The infield arc is used to enforce specific rules, particularly regarding infielders playing outside the foul lines before a pitch is thrown. It helps define the fair territory from which infielders must play.
By following these pro tips and maintaining a consistent approach to baseball field maintenance, you can ensure your field is always in prime condition, providing a safe and enjoyable playing experience for everyone involved. Remember that attention to detail in lining, infield dirt care, and overall field presentation makes a significant difference.