
Can baseball players improve their arm strength for better performance? Yes, by focusing on targeted exercises, proper mechanics, and consistent conditioning, baseball players can significantly boost their arm strength, leading to improved throwing velocity and overall on-field success.
Baseball is a game that demands a strong, resilient arm. Whether you’re a pitcher hurling fastballs or an outfielder making a long throw, arm strength is paramount. But arm strength isn’t just about raw power; it’s about a carefully balanced system of muscles, tendons, and ligaments working in harmony. Improving this complex system requires a strategic approach that goes beyond simply throwing harder. This guide will delve into the essential elements of building a stronger, more durable baseball arm.
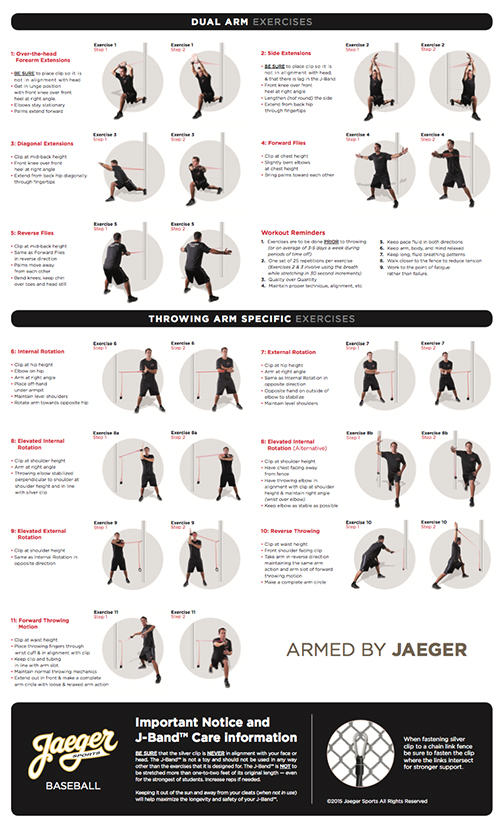
Image Source: jaegersports.com
The Pillars of Arm Strength Development
Building formidable arm strength for baseball involves a multi-faceted approach. It’s not just about lifting weights or throwing more. It encompasses specific baseball arm exercises, a focus on strength training for pitchers, dedicated throwing velocity drills, and crucial conditioning for baseball arms. We’ll explore each of these areas in detail, providing actionable strategies to help you unlock your arm’s full potential.
Foundational Strength Training for Baseball Arms
Before diving into high-intensity throwing or velocity-specific drills, it’s vital to build a solid foundation of strength. This involves strengthening the muscles that support the arm and shoulder, as well as the kinetic chain that transfers energy from the lower body to the arm.
Core Strength: The Engine of Power
A strong core is the bedrock of a powerful throw. The core muscles, including the abdominals, obliques, and lower back, are responsible for stabilizing the body and transferring energy efficiently. Without a strong core, your arm is trying to do too much work, increasing the risk of injury and limiting your power output.
Key Core Exercises:
- Plank: Excellent for overall core stability. Hold for time, focusing on keeping a straight line from head to heels. Variations include side planks and forearm planks.
- Russian Twists: Targets the obliques, crucial for rotational power. Sit with knees bent, lean back slightly, and twist your torso from side to side. You can hold a weight for added resistance.
- Medicine Ball Throws: Rotational medicine ball throws against a wall are fantastic for developing explosive core power. Focus on pivoting your hips and trunk as you throw.
- Bird-Dog: Improves core stability and balance. Start on all fours, extend opposite arm and leg while keeping your core engaged and back flat.
Lower Body Strength: Generating the Force
The power for a baseball throw originates from the ground up. Strong legs and hips are essential for generating the initial force that travels through your core and into your arm.
Key Lower Body Exercises:
- Squats: Develop overall leg strength. Bodyweight squats, goblet squats, or barbell squats are all effective.
- Lunges: Improve balance and unilateral leg strength. Forward lunges, reverse lunges, and lateral lunges are beneficial.
- Deadlifts: A comprehensive exercise for the posterior chain, including hamstrings, glutes, and lower back. Proper form is critical.
- Glute Bridges: Activates the glute muscles, which are vital for hip extension and power transfer.
Upper Body Strength: The Delivery System
While the core and lower body generate power, the upper body executes the throwing motion. Strengthening the chest, back, shoulders, and arms is crucial for both power and injury prevention.
Chest and Back Muscles: The Powerhouse Connection
- Push-ups: A fundamental bodyweight exercise that works the chest, shoulders, and triceps. Variations like incline, decline, and clap push-ups can be used to increase difficulty.
- Dumbbell Bench Press: Builds pectoral strength and can be adjusted for range of motion.
- Pull-ups/Chin-ups: Excellent for building back and bicep strength, essential for the deceleration phase of the throw.
- Rows (Dumbbell or Barbell): Strengthen the upper back muscles, which help stabilize the shoulder and contribute to external rotation.
Shoulder and Rotator Cuff: The Precision Tools
This is where the most targeted work for arm strength and health happens. The rotator cuff muscles are small but vital for shoulder stability and controlling the arm’s movement during the throw. Rotator cuff strengthening is non-negotiable for any baseball player.
Key Shoulder and Rotator Cuff Exercises:
- External Rotation (with band or light weight): Stand with your elbow bent at 90 degrees, holding a resistance band or light dumbbell. Keeping your elbow tucked to your side, rotate your forearm outward. This strengthens the infraspinatus and teres minor.
- Internal Rotation (with band or light weight): Similar to external rotation, but rotate your forearm inward across your body. This targets the subscapularis.
- Scapular Retractions: Squeeze your shoulder blades together as if trying to hold a pencil between them. This strengthens the rhomboids and middle trapezius, improving posture and shoulder blade control.
- Face Pulls: Using a cable machine or resistance band, pull the rope towards your face, keeping your elbows high. This works the rear deltoids and upper back muscles, aiding in shoulder health and posture.
- Y-T-W-L Exercises: Performed with light weights or resistance bands, these exercises target various muscles around the shoulder blade and rotator cuff, promoting overall shoulder stability.
- Y: Lie face down, arms extended overhead in a “Y” shape. Lift arms off the ground.
- T: Lie face down, arms extended to the sides in a “T” shape. Lift arms off the ground.
- W: Lie face down, bend elbows and bring arms into a “W” shape. Lift arms off the ground.
- L: Lie face down, bend elbows to 90 degrees with thumbs pointing up. Lift arms off the ground.
Forearm and Grip Strength: The Final Connection
Forearm strength for baseball is critical for controlling the ball and generating spin. A strong grip also contributes to overall arm power and reduces the chance of the ball slipping.
Key Forearm and Grip Exercises:
- Wrist Curls: Sit with forearms resting on your thighs, palms up, holding dumbbells. Curl your wrists upwards.
- Reverse Wrist Curls: Similar position, but with palms facing down. Extend your wrists upwards.
- Hammer Curls: Hold dumbbells with palms facing each other. Curl the dumbbells up, maintaining the neutral grip. This works the brachioradialis, a key forearm muscle.
- Grip Trainers: Devices designed to strengthen the hand and forearm muscles.
- Farmer’s Walks: Hold heavy dumbbells or kettlebells in each hand and walk for a set distance or time. This is excellent for grip, forearm, and overall conditioning.
Progressive Overload: The Key to Continuous Gains
To continuously improve arm strength, you must progressively challenge your muscles. This principle, known as progressive overload, means gradually increasing the demands placed on your body over time.
Methods for Progressive Overload:
- Increase Weight: Gradually lift heavier weights for the same number of repetitions.
- Increase Repetitions: Perform more repetitions with the same weight.
- Increase Sets: Add more sets to your exercises.
- Decrease Rest Time: Shorten the rest periods between sets.
- Improve Form: Performing an exercise with better technique can make it more challenging.
- Increase Frequency: Train a muscle group more often, allowing for adequate recovery.
The Role of Weighted Balls in Velocity Development
A weighted ball program can be a highly effective tool for increasing throwing velocity, but it must be implemented cautiously and with proper guidance. Weighted balls are designed to overload the arm during the throwing motion, promoting increased muscle activation and potentially leading to greater velocity.
How Weighted Balls Work:
- Overload Principle: By throwing balls of varying weights, you challenge the arm muscles to generate more force.
- Proprioception: The added weight can improve the body’s awareness of limb position and movement.
- Eccentric Loading: Weighted balls can increase the eccentric (lengthening) load on the muscles, which is important for deceleration and injury prevention.
Implementing a Weighted Ball Program:
- Start Light: Begin with lighter weighted balls than your regulation baseball and progress gradually.
- Focus on Mechanics: Never sacrifice proper pitching mechanics for velocity when using weighted balls. Focus on smooth, controlled throws.
- Low Volume: Use weighted balls for a limited number of throws per session, typically within a structured throwing program.
- Qualified Supervision: It is highly recommended to work with a qualified coach or trainer when starting a weighted ball program to ensure proper technique and avoid injury.
- Progression: Start with balls slightly heavier than a baseball, then progress to heavier balls and potentially lighter balls for a velocity burst. A common progression might look like this:
- Phase 1 (Arm Action & Strength): Focus on building arm speed and strength with heavier balls (e.g., 10-16 oz.). Throws are typically shorter distances.
- Phase 2 (Velocity & Control): Transition to balls closer to regulation weight, focusing on velocity with good mechanics. This phase might include lighter balls (e.g., 4-6 oz.) to exaggerate arm speed.
- Phase 3 (Velocity Enhancement): Integrate regulation baseballs with an increased focus on maximum effort throws while maintaining mechanics.
Important Considerations for Weighted Balls:
- Not a Substitute for Technique: Weighted balls are an adjunct to, not a replacement for, developing sound mechanics.
- Recovery is Key: Ensure ample rest and recovery between weighted ball sessions.
- Listen to Your Body: If you feel any pain, stop immediately.
Drills for Throwing Velocity and Arm Endurance
Beyond general strength training, specific drills are crucial for translating that strength into effective throwing velocity and building arm endurance.
Throwing Velocity Drills
These drills focus on maximizing the speed and efficiency of your throwing motion.
- Long Toss: A cornerstone of any throwing program. Start close and gradually increase the distance, focusing on a smooth, repeatable motion. This builds arm strength, stamina, and helps with throwing accuracy over distance. As you get further, you’ll naturally throw harder to reach your partner.
- Plyometric Medicine Ball Throws: As mentioned earlier, these are excellent for developing explosive power. Examples include:
- Rotational Throws: Stand with your side to a wall, rotate your torso, and throw the ball against the wall. Catch the rebound and repeat.
- Overhead Throws: Throw a medicine ball overhead and backward against a wall, focusing on engaging your entire body.
- Chest Passes: Partner chest passes or throws against a wall, focusing on explosive force.
- Arm Circles (with light weight or resistance band): Forward and backward arm circles, performed with controlled movements and light resistance, can help warm up the shoulder and improve range of motion, contributing to better velocity.
Arm Endurance and Conditioning
A strong arm is only useful if it can sustain its performance throughout a game or season. Conditioning for baseball arms involves building the muscles’ ability to resist fatigue.
- Arm Care Routines: Dedicated routines involving exercises like those for rotator cuff strengthening should be performed regularly, not just when you’re feeling sore. Consistency is key.
- Interval Throwing: Mimics game situations by involving periods of high-intensity throwing followed by rest or lower-intensity throws.
- Long Toss Progression: As described above, long toss helps build arm endurance over distance.
- Resistance Band Work: Regular use of resistance bands for various rotational and non-rotational shoulder movements helps maintain muscle activation and endurance.
The Critical Importance of Proper Pitching Mechanics
Even with exceptional arm strength, proper pitching mechanics are essential for maximizing velocity, efficiency, and most importantly, injury prevention. Poor mechanics can negate the benefits of strength training and put undue stress on the arm.
Key Elements of Proper Mechanics:
- Lower Half Drive: Power generation starts with the legs and hips. A strong drive from the mound is crucial.
- Core Rotation: Efficient transfer of energy through a stable and powerful core.
- Arm Path: A fluid and consistent arm path from the wind-up to release.
- Follow-Through: A complete and controlled follow-through is vital for decelerating the arm and reducing stress.
How to Improve Mechanics:
- Video Analysis: Filming your pitching motion can help identify flaws.
- Coaching: Work with experienced pitching coaches who can provide personalized feedback.
- Drills: Specific drills can isolate and improve particular aspects of your mechanics.
- Strength Training: As discussed, a strong kinetic chain (legs, core, back) supports good mechanics.
Rest and Recovery: The Unsung Heroes
You cannot outwork poor recovery. Rest and proper nutrition are just as vital to arm strength gains as the training itself.
- Adequate Sleep: Muscle repair and growth primarily occur during sleep. Aim for 7-9 hours per night.
- Nutrition: A balanced diet rich in protein supports muscle repair. Hydration is also crucial.
- Active Recovery: Light activities like walking, stretching, or foam rolling can aid blood flow and reduce muscle soreness on rest days.
- Listen to Your Body: Don’t push through sharp pain. Differentiate between muscle soreness and injury.
Sample Training Split (Example)
This is a general example and should be adapted based on individual needs, training experience, and season schedule.
Day 1: Strength Focus (Lower Body & Core)
- Squats: 3 sets of 8-10 reps
- Deadlifts (or Romanian Deadlifts): 3 sets of 6-8 reps
- Lunges: 3 sets of 10-12 reps per leg
- Plank: 3 sets, hold for 60 seconds
- Russian Twists: 3 sets of 15-20 reps per side
Day 2: Throwing & Arm Care
- Warm-up: Light cardio, dynamic stretching
- Long Toss: Gradually increase distance, focus on mechanics and building up to game-like throws
- Weighted Ball Throws (if programmed): Low volume, focus on mechanics
- Arm Care Routine: Rotator cuff exercises, scapular stability drills
Day 3: Strength Focus (Upper Body & Power)
- Bench Press (or Dumbbell Press): 3 sets of 8-10 reps
- Pull-ups (or Lat Pulldowns): 3 sets of as many reps as possible (AMRAP)
- Overhead Press: 3 sets of 8-10 reps
- Medicine Ball Rotational Throws: 3 sets of 10-12 reps per side
- Forearm Exercises (Wrist Curls, Hammer Curls): 3 sets of 15-20 reps
Day 4: Rest or Active Recovery
- Light stretching, foam rolling, walking.
Day 5: Throwing & Velocity Drills
- Warm-up: Light cardio, dynamic stretching
- Short/Medium Toss: Focus on velocity and quick releases
- Velocity Drills (e.g., mound work, specific throwing drills): Moderate volume
- Arm Care Routine: Rotator cuff exercises, forearm strengthening
Day 6: Strength Focus (Accessory & Endurance)
- Push-ups: 3 sets AMRAP
- Rows: 3 sets of 10-12 reps
- Face Pulls: 3 sets of 15-20 reps
- Farmer’s Walks: 3 sets, walk for 30-60 seconds
- Grip Strengthening Exercises
Day 7: Rest
Common Pitfalls to Avoid
- Overtraining: Pushing too hard without adequate rest leads to burnout and injury.
- Neglecting Mechanics: Focusing solely on strength without improving your throwing motion.
- Ignoring Arm Care: Skipping rotator cuff strengthening and shoulder stability exercises.
- Sudden Increases in Intensity/Volume: Gradual progression is key.
- Poor Nutrition and Hydration: Essential for muscle recovery and performance.
Conclusion: A Long-Term Commitment to Arm Health and Power
Improving arm strength for baseball is a journey, not a sprint. It requires dedication to consistent training, a focus on proper pitching mechanics, and a commitment to arm care and recovery. By integrating a well-rounded approach that includes targeted baseball arm exercises, strength training for pitchers, throwing velocity drills, weighted ball program implementation (with caution), and diligent conditioning for baseball arms, you can build a stronger, more durable arm capable of delivering peak performance throughout the season. Remember, the goal is not just raw power, but sustainable power that keeps you on the field and performing at your best.
Frequently Asked Questions (FAQ)
Q1: How often should I do rotator cuff strengthening exercises?
A: Rotator cuff strengthening exercises should ideally be performed 2-3 times per week as part of your regular training routine, not just on throwing days. Consistency is key for building and maintaining shoulder stability.
Q2: Can I use weighted balls if I’m not a pitcher?
A: Yes, outfielders and infielder can also benefit from carefully programmed weighted ball work to improve their throwing velocity and arm strength. However, the volume and intensity should be adjusted based on your specific position and role.
Q3: What is the fastest way to improve arm strength?
A: There’s no single “fastest” way, as building sustainable arm strength is a process. However, a combination of consistent, progressive strength training, diligent arm care, and smart throwing program design, focusing on proper pitching mechanics, will yield the best results over time.
Q4: How important is forearm strength for baseball?
A: Forearm strength for baseball is very important. It contributes to a strong grip, helps with ball control and spin, and plays a role in the deceleration phase of the throwing motion, which can help prevent injuries.
Q5: Should I do my throwing drills on the same day as my heavy lifting?
A: It’s generally best to separate heavy lifting days from your most intense throwing days. If you must combine them, prioritize your throwing session when you are freshest, and perform your arm care and lighter strength work afterwards. Alternatively, perform lighter throwing or arm care on a lifting day.
Q6: What is considered “overtraining” for my arm?
A: Overtraining your arm typically involves experiencing persistent fatigue, decreased velocity or performance, increased soreness that doesn’t go away, and potentially sharp or nagging pain. It happens when you don’t allow adequate recovery between intense sessions.
Q7: How do I know if I have good shoulder stability?
A: Good shoulder stability means your shoulder joint feels controlled and secure during movement. You can perform simple tests like holding your arm in various positions without shaking or pain. Exercises like the Y-T-W-L movements and performing controlled medicine ball throws help assess and improve shoulder stability exercises baseball. If you experience instability or pain, consult a professional.