
Can I clean the inside of my baseball glove with household cleaners? Yes, but it’s highly recommended to use specialized baseball glove cleaning products or natural, gentle alternatives to avoid damaging the leather. Household cleaners can be too harsh and strip away essential oils, leading to dryness and cracking.
Your baseball glove is more than just equipment; it’s a loyal partner on the field. It catches pitches, scoops ground balls, and holds your hand secure through every play. But over time, the inside of your glove can accumulate sweat, dirt, and even odor. Keeping the interior clean is crucial for both performance and longevity. This guide will walk you through everything you need to know about cleaning the inside of your baseball glove properly, ensuring it stays game-ready for seasons to come.
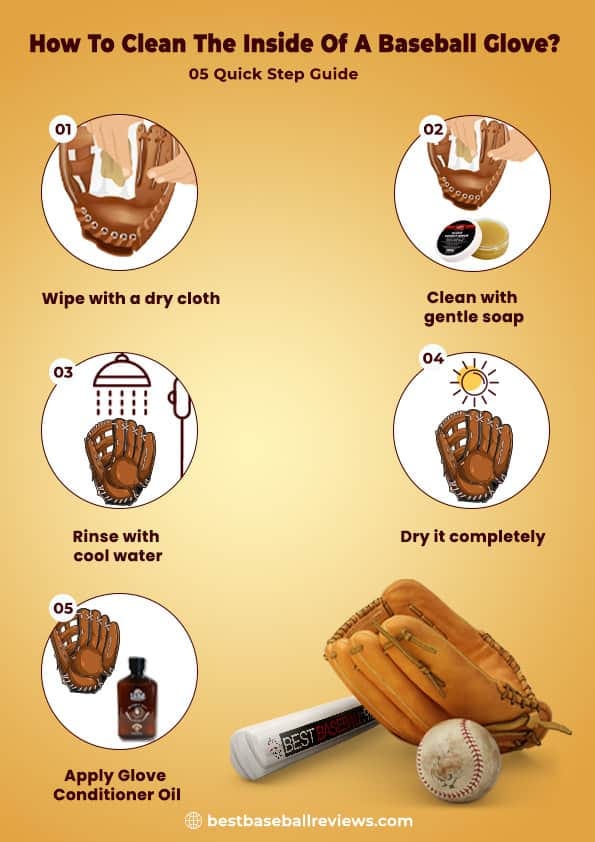
Image Source: miro.medium.com
The Importance of Glove Interior Cleanliness
Why bother with the inside of your glove? It might seem less exposed than the exterior, but several factors make interior cleaning essential:
- Sweat Absorption: Your hands sweat, especially during intense games or practices. This sweat seeps into the glove’s lining, creating a damp environment.
- Odor Buildup: Dampness and trapped bacteria are a recipe for unpleasant odors. A smelly glove isn’t just embarrassing; it can be distracting.
- Material Degradation: Persistent moisture and salt from sweat can break down the leather lining over time, making it stiff and prone to cracking.
- Grip Enhancement: A clean and dry interior provides a better grip on your hand, allowing for quicker transfers and more confident play.
- Breaking In a Baseball Glove: A clean surface can also aid in the process of breaking in a baseball glove, allowing conditioners and oils to penetrate more effectively.
Essential Supplies for Glove Interior Cleaning
Before you begin, gather these items:
- Soft, Clean Cloths: Microfiber cloths are ideal as they are absorbent and won’t scratch the leather.
- Mild Soap or Natural Leather Cleaner: A small amount of saddle soap, specialized baseball glove cleaner, or even a very mild, unscented soap diluted with water.
- Water: Lukewarm water is best.
- Baseball Glove Conditioner or Oil: Crucial for rehydrating the leather after cleaning.
- Optional: Baking Soda: For tackling stubborn odors.
- Optional: A Soft Brush: Like a toothbrush, for gently working cleaners into crevices.
- Optional: Paper Towels: For drying.
Step-by-Step Guide to Cleaning the Glove Interior
Follow these steps for a thorough cleaning:
Step 1: Empty Your Glove
- First, remove anything stored inside your glove, such as batting gloves or extra lacing.
Step 2: Initial Wipe Down
- Take a clean, dry cloth and wipe down the entire interior of the glove. This will remove any loose dirt, dust, or debris. Pay attention to the finger stalls and the pocket.
Step 3: Mild Cleaning Solution
- Dampen a clean cloth with lukewarm water. If using a mild soap, add just a tiny amount to the water or apply a small amount of saddle soap directly to the damp cloth.
- Important: Do not saturate the cloth. You want it damp, not wet.
- Gently wipe down the interior lining of the glove. Work in small sections, focusing on areas that appear dirty or stained.
- Use a soft brush (like an old toothbrush) dipped in the mild cleaning solution to gently scrub away any stubborn grime in the seams or tight spots. Be very gentle.
Step 4: Rinse and Wipe
- Take a separate clean cloth, dampen it with plain water, and wring it out thoroughly.
- Wipe down all the areas you just cleaned to remove any soap residue. Again, avoid over-wetting the glove.
- You might need to repeat this rinsing step a couple of times to ensure all soap is gone.
Step 5: Drying
- This is a critical step in baseball glove care. Stuff the glove loosely with paper towels or dry cloths. This helps absorb excess moisture from the inside and maintains the glove’s shape.
- Let the glove air dry completely at room temperature. Never place your glove near a direct heat source like a heater, hair dryer, or in direct sunlight, as this can cause the leather to dry out, crack, and become brittle. This process can take 24-48 hours or even longer depending on humidity and how damp the glove became.
Step 6: Conditioning the Leather
- Once the glove is completely dry, it’s time for baseball glove conditioner. Cleaning, especially with any soap, can strip natural oils from the leather. Conditioning replenishes these oils, keeping the leather supple and preventing it from drying out.
- Apply a small amount of your chosen baseball glove conditioner or oil to a clean cloth. A little goes a long way.
- Gently rub the conditioner into the entire interior lining of the glove. Focus on the areas that feel dry.
- Work it into the finger stalls, the heel, and the webbing where it meets the lining.
- Allow the conditioner to penetrate the leather for a few hours, or as directed by the product’s instructions.
- After the conditioning period, take a clean, dry cloth and buff out any excess conditioner. The goal is to nourish the leather, not leave it greasy. This step is vital for baseball glove restoration.
Tackling Stubborn Odors
If a simple wipe-down doesn’t eliminate that “gym bag” smell, try these methods:
Using Baking Soda
- Ensure the glove is completely dry.
- Generously sprinkle baking soda inside the glove. Make sure to get it into all the nooks and crannies.
- Close the glove as much as possible.
- Leave it overnight, or even for a couple of days. Baking soda is excellent at absorbing odors.
- Afterward, thoroughly shake out all the baking soda. You might need to use a soft brush or a vacuum with a brush attachment (on low suction) to remove all the powder.
- If there’s still a residual odor, you can try a specialized baseball glove smell remover product.
Activated Charcoal Inserts
- Commercially available activated charcoal inserts are designed to absorb moisture and odors from sports equipment. You can place these inside your glove when it’s not in use.
Conditioning a New Baseball Glove’s Interior
When you first get a new baseball glove, the interior might feel a bit stiff. Conditioning a new baseball glove is key to making it comfortable and game-ready.
- Clean Slate: Even new gloves can benefit from a light clean. A simple wipe with a slightly damp cloth can remove any manufacturing residues.
- Apply Conditioner: Use a minimal amount of baseball glove conditioner on the inside lining. Focus on areas that will be in direct contact with your hand.
- Work It In: Gently massage the conditioner into the leather.
- Break-In Period: Combine conditioning with the natural process of breaking in a baseball glove. Wear it, catch with it, and mold it to your hand.
How to Treat a Baseball Glove: Regular Maintenance
Consistent care is the best way to prevent the need for deep cleaning and ensure your glove’s longevity.
Weekly/Bi-Weekly Checks:
- Wipe Down: After each use, give the interior a quick wipe with a dry cloth to remove sweat.
- Air Out: If possible, let your glove air out for a bit after games or practices.
Monthly Conditioning:
- Light Conditioning: Apply a thin layer of baseball glove conditioner to the interior lining once a month, or as needed based on how dry the leather feels. This helps maintain suppleness.
- Proper Storage: Store your glove in a cool, dry place. Avoid damp basements or hot car trunks. Keeping it in a glove bag can protect it from dust and excessive moisture.
Baseball Glove Oil vs. Conditioner
While often used interchangeably, there’s a slight difference:
- Baseball Glove Oil: Typically petroleum-based, can be heavier and may darken the leather more. Can be effective but use sparingly.
- Baseball Glove Conditioner: Often made with natural oils and waxes (like lanolin, beeswax, mink oil). Generally lighter and formulated to penetrate and protect without making the glove too greasy. This is often the preferred choice for conditioning a new baseball glove and for general baseball glove care.
When cleaning the inside, a conditioner is generally the safer and more effective choice for maintaining the leather’s feel and flexibility.
Common Mistakes to Avoid
- Over-Wetting: Soaking the glove can damage the leather and stuffing, leading to mildew and a misshapen glove.
- Harsh Chemicals: Avoid household cleaners, WD-40, or vegetable oils. These can harm the leather or leave a residue that attracts dirt.
- Heat Drying: Never use a hairdryer, oven, or direct sunlight to dry your glove.
- Over-Oiling: Too much oil can make the glove greasy, heavy, and potentially weaken the lacing. It can also make the pocket feel slippery.
- Ignoring the Interior: Forgetting about the inside means sweat and dirt accumulate unchecked, accelerating wear and tear.
Baseball Glove Restoration: Bringing Back the Glory
If your glove is old, dry, or has seen better days, a more intensive baseball glove restoration might be in order. This involves:
- Deep Cleaning: A thorough interior and exterior cleaning.
- Leather Repair: Addressing any small cracks or tears with leather repair compounds if necessary.
- Thorough Conditioning: Applying multiple thin coats of high-quality baseball glove conditioner, allowing each to penetrate.
- Re-Lacing: Replacing worn-out lacing can significantly improve the glove’s structure and feel.
Restoration is a commitment, but it can bring a beloved glove back to life.
Table: Glove Cleaning Schedule Recommendations
| Frequency | Action | Interior Focus | Exterior Focus |
|---|---|---|---|
| After Each Use | Wipe Down | Dry cloth to absorb sweat. | Dry cloth to remove surface dirt. |
| Weekly | Air Out | Ensure glove is open and not compressed. | Wipe down any visible dirt. |
| Monthly | Light Conditioning | Apply a thin layer of conditioner to the lining. | Apply a thin layer of conditioner to the shell. |
| Quarterly/Bi-Annually | Deeper Clean & Condition | Mild soap/cleaner on interior lining, followed by thorough conditioning. | Clean with saddle soap or glove cleaner, then condition. Check lacing. |
| Annually | Inspection & Minor Repairs | Check lining for wear. Consider odor removal treatments if needed. | Inspect for dry spots, cracks, or damaged lacing. Address as needed. |
| As Needed | Odor Removal / Stubborn Dirt | Baking soda, charcoal inserts, or specialized cleaners. | Spot cleaning for stubborn stains. |
Frequently Asked Questions (FAQ)
- Q: How often should I clean the inside of my baseball glove?
- A: For active players, a quick wipe-down after every use is recommended. A more thorough cleaning and conditioning of the interior is generally needed every 1-3 months, depending on how much you play and how much your hands sweat.
- Q: Can I use baby powder inside my baseball glove?
- A: While baby powder absorbs moisture, it can cake up and leave a residue that might impede the leather’s breathability or mix with sweat to create a paste. Baking soda is generally a better option for odor and moisture absorption.
- Q: My glove smells bad. What’s the best baseball glove smell remover?
- A: Baking soda is a fantastic natural option. For commercial products, look for sprays specifically designed for sports equipment or baseball gloves, often containing enzymes that break down odor-causing bacteria.
- Q: How do I condition the inside of my baseball glove without making it greasy?
- A: Use a minimal amount of conditioner on a cloth, not directly on the glove. Apply it in thin, even coats and buff off any excess after it has had time to penetrate. It’s better to apply several thin coats than one thick one.
- Q: Will cleaning the inside damage the glove?
- A: If done correctly with appropriate products and minimal moisture, cleaning the inside of your baseball glove will not damage it. In fact, it will help preserve it. The risks come from using harsh chemicals, excessive water, or heat.
By following these comprehensive steps and maintaining a regular baseball glove care routine, you can keep the inside of your glove clean, comfortable, and ready for action, ensuring it performs at its best for years to come.