
What is the best way to chalk a baseball field? The best way to chalk a baseball field is to prepare your field, gather the right tools, and follow a systematic approach to create crisp, accurate lines that enhance the game. This guide will walk you through the entire process of baseball field lining so you can achieve professional results.
Chalking a baseball diamond is more than just drawing lines; it’s about preparing a canvas for the game. A well-lined field not only looks good but also ensures fair play and provides clear boundaries for players. Whether you’re a groundskeeper at a professional stadium or a volunteer preparing a local park, mastering the art of marking a baseball field is crucial.
This comprehensive guide will cover everything you need to know about chalking a baseball diamond, from selecting the right materials to the precise techniques for baseball field maintenance. We’ll break down the process for each key area, including how to chalk a baseball infield, chalking baselines, lining pitcher’s mound, and chalking batter’s box.
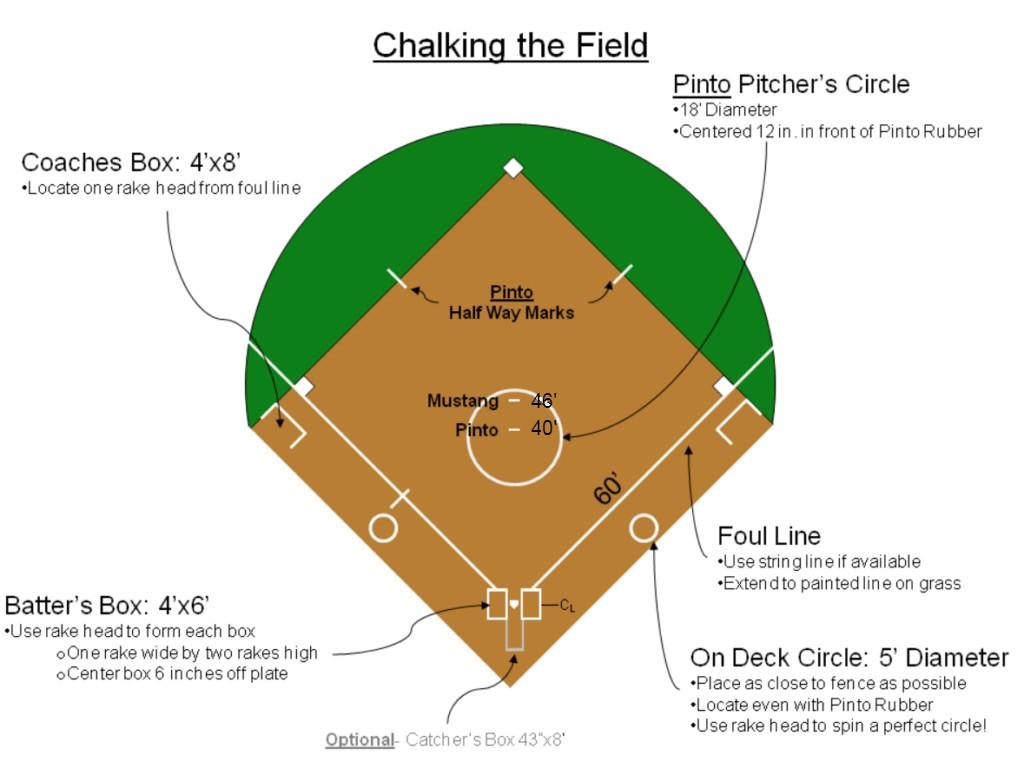
Image Source: www.westseattlebaseball.com
Preparing Your Field for Chalking
Before you even think about reaching for the chalk, a clean slate is essential. Proper preparation makes the entire baseball field chalking process smoother and results in sharper lines.
Clearing Debris
Step 1: Remove Loose Debris
Walk the entire field and pick up any rocks, twigs, leaves, or other debris. These can interfere with your chalk lines, making them uneven or broken. Use a rake or a blower for larger areas.
Step 2: Sweep or Blow the Infield
The infield skin is where most of your detailed lining will happen. Use a stiff broom or a leaf blower to clear away loose dirt, dust, and any remaining debris. This ensures the chalk adheres well to the compacted surface.
Assessing the Existing Lines
If your field has existing chalk lines from a previous game or season, you’ll need to decide whether to cover them or remove them.
- Covering: For minor touch-ups or if the old lines are still relatively clear, you can often simply apply new chalk over the old. This is faster but might result in slightly thicker or less defined lines.
- Removing: For a completely fresh start, you can use a stiff brush, a broom, or even a hose to wash away old chalk. Ensure the surface dries completely before relining.
Watering the Infield (Optional but Recommended)
A slightly damp infield surface helps the chalk adhere better and prevents it from being blown away by wind or foot traffic too quickly.
- Light Mist: Use a hose with a fine spray nozzle to lightly mist the infield, especially the areas where you’ll be applying lines.
- Avoid Saturation: Do not soak the infield. Too much water will make the surface muddy and difficult to work with, and the chalk will likely not set properly. The goal is a surface that feels cool and slightly damp to the touch, not wet.
Essential Baseball Field Chalking Tools
Having the right baseball field chalking tools makes all the difference. Investing in quality equipment will save you time and effort, leading to a superior finish.
Here’s a list of essential tools:
- Baseball Field Striper: This is the most important tool for chalking a baseball field. Field stripers are machines designed to apply a consistent, controlled line of chalk. They come in various types, from walk-behind models to towed units.
- Walk-Behind Stripers: Ideal for smaller fields or for detailed work. They use a gravity feed or a pump system to dispense chalk.
- Broadcast Stripers: More commonly used for larger fields, these have a wider application path.
- Baseball Field Chalk: Use chalk specifically designed for sports fields.
- Calcium Carbonate (Lime): This is the most common and cost-effective type. It provides a bright white line and is relatively safe for grass. It tends to “wash away” with rain.
- Synthetic Chalk: These are often more durable and weather-resistant but can be more expensive.
- Measuring Tapes: Essential for accurate placement of bases, pitcher’s mound, and foul lines. A 100-foot tape measure is usually sufficient.
- String Line and Stakes: For ensuring straight foul lines and baselines.
- Pacing Stick or Wheel: For measuring larger distances accurately.
- Stiff Broom or Brush: For sweeping and cleaning the infield.
- Leaf Blower: To clear loose debris.
- Safety Glasses and Gloves: Protect your eyes and skin from chalk dust.
- Water Source (Hose and Sprayer): For dampening the infield.
Step-by-Step Guide to Chalking a Baseball Field
Now, let’s get down to the actual process of applying chalk to baseball field areas.
Step 1: Layout and Measure the Field
Accuracy starts with proper layout. This is especially critical for foul lines and base paths.
Laying Out Foul Lines
Foul lines are the boundaries of fair territory. They extend from home plate through first and third base.
- Home Plate to First Base:
- Drive a stake into the ground directly behind home plate, aligned with the back corner of the batter’s box.
- Measure 85 feet (for standard baseball fields) along the line extending from that stake through the intended first base position. Drive another stake at this point.
- Run a taut string between these two stakes. This string will be your guide for the foul line.
- Home Plate to Third Base:
- Repeat the process on the third base side, driving a stake behind home plate aligned with the other back corner of the batter’s box.
- Measure 85 feet along this line. Drive a stake at this point.
- Run a taut string between these stakes.
Laying Out Base Paths
Base paths are the lines connecting the bases.
- First Base Path: Measure 15 feet from first base towards second base. Mark this point. The path from first to second is typically 90 feet.
- Second Base Path: Measure 15 feet from second base towards first base. Mark this point.
- Third Base Path: Measure 15 feet from third base towards second base. Mark this point.
- Connecting the Dots: Use your string and stakes to mark the lines from first base to the 15-foot mark towards second, and then from third base to its 15-foot mark towards second. For a professional field, the base paths are typically 85 feet from base to base.
Step 2: Chalking the Infield and Base Paths
This is where your baseball field striper comes into play.
Chalking Baselines
- Using the String Guide: Align your striper so that the chalk dispensing mechanism runs directly along the taut string line.
- Applying Chalk:
- Ensure your striper is filled with the appropriate amount of chalk.
- Start at one end of the line (e.g., home plate) and push the striper forward at a steady, consistent pace.
- Maintain a consistent distance from the string to ensure a straight line.
- Overlap the chalk slightly at the end of each pass to create a continuous line.
- Adjusting Line Width: Most stripers allow you to adjust the width of the chalk line. A standard width for baselines is typically 2 inches. Consult league rules for specific requirements.
- Applying to Paths: Repeat this process for all baselines, ensuring they are clear and well-defined.
Chalking the Infield Skin
Beyond the base paths, you might want to define other areas of the infield.
- Pre-molded Lines: For a truly professional look, consider using pre-molded infield dirt in specific areas or using a specialized tool to create edging along the base paths. However, for simple chalking, the focus is on the lines.
- General Infield Border: Some fields have a chalked border around the entire infield skin, separating it from the outfield grass. Measure and mark this border using your string and stakes, then apply chalk as you did for the baselines.
Step 3: Lining the Pitcher’s Mound
The pitcher’s mound has specific dimensions and markings that are critical for the game.
Measuring and Marking the Mound
- Pitcher’s Plate: The pitcher’s plate is a rectangular piece of rubber, typically 24 inches by 6 inches, set into the mound. Its front edge is 60 feet 6 inches from the rear point of home plate. Ensure the front edge is perfectly parallel to home plate.
- Mound Diameter: The regulation diameter of the pitcher’s mound is 18 feet. The front edge of the pitcher’s plate is centered on the front edge of this 18-foot circle.
- Marking the Circle:
- Find the center of the mound (this will be the center of the pitcher’s plate).
- Use a string and stake, or a specialized mound compass, to mark the 18-foot diameter circle. Tie one end of the string to a central stake and the other end to a can of chalk or a marker. Stretch the string taut and walk in a circle to draw the boundary.
Applying Chalk to the Pitcher’s Mound
- Mound Edges: Use your striper or a hand-held chalk applicator to carefully chalk the outer edge of the 18-foot circle. Go slow and steady to ensure a clean, consistent line.
- Pitcher’s Plate: The pitcher’s plate itself is usually not chalked, but the area immediately around it might be cleaned.
- Batter’s Box Lines (Related to Mound): While not directly on the mound, the batter’s box is in close proximity and is crucial for the game.
Step 4: Chalking the Batter’s Box
The batter’s box is a critical area for both the batter and the pitcher.
Dimensions and Placement
- Width: The batter’s box is typically 4 feet wide.
- Length: It is typically 6 feet long, extending from the front edge of home plate.
- Alignment: The box should be centered with home plate, with 2 feet of the box extending on either side of the plate’s width.
Marking the Batter’s Box
- Using Home Plate as a Guide:
- Align your striper or chalk dispenser with the edge of home plate.
- Measure out 6 feet from the front edge of home plate and mark a point. This will be the back of the batter’s box.
- Measure 4 feet from the edge of home plate on either side for the width of the box.
- Chalking the Lines:
- You can often use a hand-held chalk applicator or a striper with a narrow setting for this.
- Carefully chalk the two side lines extending 6 feet from home plate.
- Chalk the back line connecting the ends of the side lines.
- You may also want to chalk the front line where the batter stands.
Step 5: Fine-Tuning and Finishing Touches
Once the main lines are down, take a step back and refine.
- Check for Straightness and Consistency: Walk along all the lines. Are they straight? Is the chalk applied evenly? Touch up any thin spots or wobbly sections.
- Edge Definition: Ensure the chalk lines have a clean edge. If the chalk has feathered or spread, you can gently brush it back into place before it dries completely.
- Home Plate Area: Ensure the chalk lines around home plate are crisp and clearly define the batter’s box and the front edge of home plate.
- Catcher’s Box (Optional): Some fields may also have a catcher’s box marked behind home plate. This is usually a rectangular area, typically 10 feet long and 5 feet wide. Mark and chalk this if required by league rules.
Maintaining Your Chalked Field
Proper baseball field maintenance extends beyond just the initial chalking.
Durability of Chalk Lines
The longevity of your chalk lines depends on several factors:
- Type of Chalk: Calcium carbonate chalk will wear away with rain and high traffic. Synthetic chalks are more durable.
- Weather Conditions: Wind, rain, and heavy play will degrade chalk lines faster.
- Infield Surface: A compacted, smooth infield will hold chalk better than a loose, sandy surface.
Re-Chalking Frequency
- Daily: For heavily used fields, touch-ups on high-traffic areas like the batter’s box and base paths might be needed daily.
- Weekly: A full re-chalking is often done weekly, especially during peak season, to maintain a professional appearance and ensure clear boundaries.
- As Needed: After significant rain or heavy use, you may need to chalk more frequently.
Best Practices for Longevity
- Apply to Damp Ground: As mentioned, a slightly damp infield helps chalk adhere.
- Consistent Application: Using a good quality striper and applying a consistent layer of chalk will make the lines last longer.
- Minimize Driving on Lines: Avoid driving maintenance vehicles directly on chalk lines whenever possible.
- Proper Storage: Store your chalk and equipment in a dry place to prevent clumping and degradation.
Different Types of Chalk and Their Properties
When it comes to baseball field chalking tools and materials, you have a few options.
| Chalk Type | Pros | Cons | Best Use Case |
|---|---|---|---|
| Calcium Carbonate (Lime) | Bright white, inexpensive, readily available. | Washes away easily with rain, can be dusty, may affect soil pH slightly. | Frequent chalking, budget-conscious fields. |
| Synthetic Chalk | More durable, weather-resistant, less dusty, consistent particle size. | More expensive, may require specific stripers. | Fields requiring longer-lasting lines, professional venues. |
| Combination Chalks | Blend of natural and synthetic for a balance of cost and performance. | Varies depending on the blend. | Good all-around option for many fields. |
Important Note on Lime: While common, pure calcium hydroxide (hydrated lime) can be caustic. Always opt for calcium carbonate or specifically labeled “sports field chalk.” Always wear safety gear when handling any chalk product.
Troubleshooting Common Chalking Issues
Even with the best intentions, you might encounter problems.
Problem: Fuzzy or Feathered Lines
- Cause: Applying chalk to a dry surface, wind, or overfilling the striper.
- Solution: Lightly mist the infield before chalking. Use a slower, more consistent pace with the striper. If lines are already fuzzy, a gentle brush can sometimes clean them up before they dry.
Problem: Broken or Uneven Lines
- Cause: Uneven chalk flow from the striper, debris on the field, or inconsistent speed.
- Solution: Ensure your striper is clean and functioning correctly. Clear the field thoroughly. Maintain a steady walking pace.
Problem: Chalk Not Sticking
- Cause: Infield is too dry or too wet.
- Solution: Aim for a slightly damp, not saturated, surface. Experiment with light watering if needed.
Problem: Lines Disappearing Quickly
- Cause: High winds, rain, or very dry/loose infield soil.
- Solution: Use a more durable synthetic chalk if budget allows. Ensure the infield is compacted and adequately damp before chalking.
Frequently Asked Questions (FAQ)
Here are some common questions about chalking a baseball field:
Q1: How often should a baseball field be chalked?
A1: For optimal appearance and playability, fields should be chalked weekly, with touch-ups on high-traffic areas as needed. Heavily used fields may require more frequent chalking.
Q2: What is the best chalk to use for a baseball field?
A2: Calcium carbonate (lime-based) chalk is common and cost-effective. However, synthetic chalks offer greater durability and weather resistance if your budget allows.
Q3: Can I chalk a baseball field without a striper?
A3: Yes, but it’s significantly more difficult to achieve clean, consistent lines. You can use a hand-held chalk applicator, a broom dipped in chalk, or even carefully pour chalk along a string line, but the results won’t be as professional or precise.
Q4: What are the standard dimensions for a baseball field?
A4: Standard adult baseball fields have foul lines of 325 feet to 350 feet, and a pitcher’s mound that is 18 feet in diameter, with the pitcher’s plate being 60 feet 6 inches from home plate. Base paths are typically 90 feet. Always check league-specific rules for exact dimensions.
Q5: How do I get the brightest white lines?
A5: Ensure you are using fresh, high-quality chalk. Applying chalk to a slightly damp infield surface will help it adhere better and appear brighter. Overlapping lines slightly can also create a more solid appearance.
Q6: Is chalk bad for the grass?
A6: Sports field chalk, typically calcium carbonate, is generally considered safe for grass. In fact, it’s often referred to as “lime” due to its composition. However, applying excessive amounts could potentially alter soil pH over time, so consistent, moderate application is best.
By following these steps and utilizing the right tools, you can transform any baseball field into a professional-looking playing surface, ensuring a fair and enjoyable game for everyone involved. Happy chalking!