
What is the best way to chalk a baseball field? The best way to chalk a baseball field involves precise measurements, the right equipment, and careful execution to create clear, defined lines that adhere to official baseball rules. Can I chalk a baseball field without a chalk machine? Yes, you can chalk a baseball field without a dedicated chalk machine, but it will require more effort and may result in less crisp lines. Who is responsible for chalking a baseball field? Typically, groundskeepers, league officials, or dedicated volunteers are responsible for chalking a baseball field.
Chalking a baseball field is more than just drawing white lines; it’s about preparing a safe and professional playing surface. Well-defined lines are crucial for fair play, ensuring players understand boundaries, and for maintaining the overall aesthetic of the game. This comprehensive guide will walk you through the process, from initial preparation to the final chalk line, helping you achieve a professional finish every time.
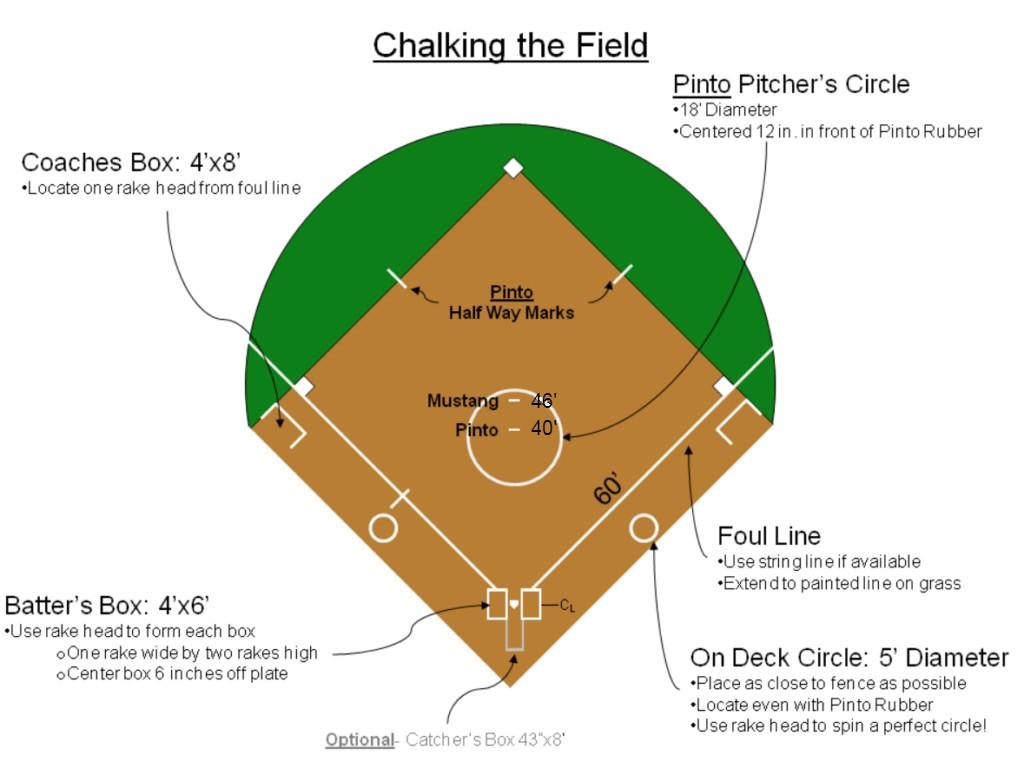
Image Source: www.westseattlebaseball.com
Preparing Your Baseball Field for Chalking
Before you even think about the chalk machine baseball will use, proper preparation is key. This involves ensuring the infield dirt is in the right condition and that you have all the necessary tools and materials.
Infield Dirt Prep: The Foundation of Crisp Lines
Infield dirt prep is paramount. A smooth, firm infield surface is essential for clean chalk lines that don’t easily smudge or disappear.
- Raking and Leveling: Begin by raking the infield to remove debris like rocks, twigs, and any clumps of dirt. A metal rake is ideal for this. If the infield is uneven, you might need to use a field groomer or even a weighted drag to level it out. The goal is a consistent, smooth surface across the entire infield.
- Moisture Content: The moisture level of the infield dirt is critical. The dirt should be damp, not wet or bone dry. Too dry, and the chalk won’t adhere well, leading to fuzzy lines. Too wet, and the chalk will clump, and the lines will be difficult to create and maintain. A good test is to grab a handful of dirt; if it forms a ball that holds its shape without crumbling, it’s about right. If it’s dusty and falls apart, it’s too dry. If it’s muddy and sticky, it’s too wet. You might need to lightly water the field before chalking if it’s too dry.
- Compaction: A firm infield surface helps chalk lines last longer. If your infield is soft, you might consider lightly rolling it. However, over-compaction can also be an issue, making it hard for chalk to penetrate. The ideal is firm but with a slight give.
Essential Tools and Materials
Having the right equipment makes the job significantly easier and more effective.
- Chalk Machine: A chalk machine baseball fields use comes in various types.
- Gravity Feed: These are common and relatively simple. Chalk powder is released from a hopper onto the ground as you push the machine.
- Push-Type (with agitator): These have a mechanism to agitate the chalk, ensuring a more consistent flow.
- Battery-Powered: For larger fields or more frequent use, battery-powered models offer convenience.
- Chalk Type: Ensure you are using baseball field chalk, often referred to as lime or calcium carbonate. This is specifically formulated to adhere to dirt and provide a bright, durable line. Avoid using construction chalk, which can be different and may not hold up as well.
- Measuring Tools:
- Measuring Tape: A long, durable measuring tape (at least 100 feet) is essential for accurate layout.
- Lineal String or Rope: A taut string will act as a guide for your chalk lines, ensuring straightness.
- Chalk Line Reel: Similar to a carpenter’s chalk line, this tool uses a string and a chalk-filled reel to create straight, dark lines. This is a good alternative or supplement to a chalk machine for precise initial line marking.
- Pacing or Stakes: For long lines like the foul lines, you’ll need a way to mark your endpoints. Stakes can be driven into the ground, or you can use a helper to hold the end of your measuring tape.
- Safety Gear: Gloves and a dust mask are recommended, especially when working with chalk powder to avoid skin irritation and inhalation.
Step-by-Step Chalking Process
Once your field is prepped and you have your tools, it’s time to get chalking. We’ll break down the process for each key area of the field.
Step 1: Laying Out the Foul Lines
The foul lines baseball umpires and players rely on start at the back of home plate and extend to the outfield fence. Accuracy here is critical for game integrity.
- Starting Point: Begin at the back tip of home plate. Drive a stake into the ground directly behind home plate, aligned with the center of home plate. This stake will be your starting point.
- Measuring the Distance: Measure the prescribed distance from home plate to first base and from home plate to third base. These distances can vary depending on the league (e.g., Little League, high school, professional). For standard baseball, it’s 90 feet between bases.
- Creating the First Foul Line (First Base Side):
- Stretch your measuring tape from the stake behind home plate to the desired foul pole location or a predetermined point down the first base line.
- For a perfectly straight line, you’ll need to mark points at regular intervals (e.g., every 10-15 feet) or use a taut string as a guide.
- Drive a stake at the end of the measurement (near the outfield fence).
- If using a string guide: Tie one end of the string to the stake behind home plate and the other end to the stake near the outfield. Ensure the string is taut.
- Chalking the Line:
- With a Chalk Machine: Set the chalk machine to a medium chalk output. Push the machine slowly and steadily along the string or your marked line. Overlap slightly with each pass to ensure a solid line.
- With a Chalk Line Reel: Snap the chalk line reel along the string guide. This will leave a chalk-dusted string. Then, carefully push your chalk machine along this newly marked chalk dust for a precise, vibrant line.
- Creating the Second Foul Line (Third Base Side): Repeat the entire process for the third base foul line, ensuring you measure the correct distance and maintain a straight path.
Table 1: Common Baseball Field Measurements (in feet)
| Feature | Little League (9-10 yrs) | Little League (11-12 yrs) | Babe Ruth League / High School | Professional Baseball |
|---|---|---|---|---|
| Home to 1st Base | 60 | 70 | 90 | 90 |
| 1st to 2nd Base | 60 | 70 | 90 | 90 |
| 2nd to 3rd Base | 60 | 70 | 90 | 90 |
| 3rd to Home Plate | 60 | 70 | 90 | 90 |
| Pitcher’s Mound | 46 | 50 | 60.5 | 60.5 |
| Home Run Fence | Varies (e.g., 200-225) | Varies (e.g., 200-250) | Varies (e.g., 300-330) | Varies (e.g., 320-400+) |
Step 2: Chalking the Base Paths
Base path chalk lines connect the bases, guiding runners and defining fair territory from foul.
- Connect the Bases: Using your measuring tape, measure the distance between first and second base, second and third base, and third and home plate. These distances should match the distances to the bases from home plate.
- Marking the Lines:
- From First to Second Base: Measure from the first base bag to the second base bag.
- From Second to Third Base: Measure from the second base bag to the third base bag.
- From Third to Home Plate: Measure from the third base bag back to home plate.
- Chalking: Use your chalk machine or chalk line reel to mark these paths. Keep the lines consistent in width, typically 2-4 inches. For base paths, a slightly narrower line can be effective.
Step 3: Marking the Batter’s Box and Catcher’s Box
Marking batter’s box and catcher’s box areas require precision as they are critical zones for the game.
- Batter’s Box Dimensions: Standard batter’s box dimensions are typically 6 feet long and 4 feet wide. The front of the box should be aligned with the front edge of home plate, and the back of the box should extend 3 feet behind the back point of home plate.
- Layout:
- Center the batter’s box on home plate.
- Use your measuring tape to mark the four corners of the batter’s box.
- You can use chalk line reels to connect these points or directly chalk the box.
- Catcher’s Box: The catcher’s box is usually 10 feet long from the back of home plate, extending back. Its width is generally aligned with the batter’s box, or slightly wider. Mark its dimensions similarly.
- Home Plate Chalk: Ensure the chalk line around home plate chalk is crisp. It’s common to chalk a line that outlines the entire plate or just the edges. This helps define the boundaries of the plate itself.
Step 4: Marking Other Field Lines (Optional but Recommended)
Depending on the league and the field’s complexity, you might also need to mark other lines.
- On-Deck Circles: These are typically 5-foot diameter circles located 75 feet from home plate in foul territory.
- Coach’s Boxes: Usually located 90 feet from first base and third base, extending 20 feet down the foul lines from the bases.
- Dugout Lines: If your dugouts are not clearly defined by other structures, you might chalk lines to indicate their boundaries.
Maintaining Your Chalked Lines
Even the best chalk job won’t last forever, especially with foot traffic and weather.
- Touch-Ups: After games or practices, inspect your lines. You may need to touch up worn areas, especially along base paths and foul lines.
- Re-Chalking Frequency: How often you need to re-chalk depends on usage and weather. For regular league play, a full re-chalk might be needed weekly or bi-weekly. Lighter use might allow for longer periods between major chalking sessions.
- Washing: If your chalk lines become too thick or smudged, you can use a field broom to gently sweep them. For more stubborn marks or before a major re-chalk, you can lightly hose down the area, let it dry, and then re-chalk.
Advanced Techniques for a Professional Finish
For those aiming for that truly professional look, consider these advanced tips.
Consistent Line Width
- Chalk Machine Settings: Familiarize yourself with your chalk machine baseball settings. Experiment on a test area to find the sweet spot for consistent line width.
- Speed: Pushing the machine at a constant speed is crucial. If you push too fast, the chalk line will be thin and broken. Push too slow, and it might become too wide and fuzzy.
Double-Coating for Durability
- For high-traffic areas or if you want extra vibrant lines, consider a double-coat.
- Lay down the first chalk line.
- Let it set for a few minutes.
- Apply a second layer of chalk directly over the first. This creates a thicker, more durable line that resists fading.
Using a String Line for Precision
- As mentioned earlier, using a string line, especially with a chalk line reel, provides an excellent guide for creating perfectly straight lines. This is invaluable for foul lines and base paths.
Chalking Indoors or Under Adverse Conditions
While this guide focuses on outdoor fields, if you ever need to chalk an indoor baseball facility:
- Surface: Indoor surfaces like turf or sport court require different chalk. Look for sports-specific chalk products designed for these materials.
- Ventilation: Ensure good ventilation, as chalk dust can accumulate.
- Water: Avoid using water unless specified by the chalk manufacturer, as it can damage some indoor surfaces.
Common Challenges and Solutions
Even with the best intentions, you might encounter issues.
- Fuzzy Lines:
- Cause: Infield too dry, chalk machine settings too high, pushing the machine too fast, or not using a string guide.
- Solution: Lightly water the infield, adjust chalk machine settings, slow down your pace, and use a string guide.
- Broken Lines:
- Cause: Pushing the chalk machine too fast, uneven infield surface, or clumping chalk.
- Solution: Slow down your pace, ensure the infield is smooth, and check your chalk for clumping (you may need to sift it or use a different bag).
- Chalk Not Sticking:
- Cause: Infield too dry or too wet.
- Solution: Adjust moisture levels. If too dry, lightly water. If too wet, wait for it to dry to the appropriate level.
- Lines Disappearing Quickly:
- Cause: Light chalk application, soft infield, or high winds.
- Solution: Double-coat your lines, ensure proper infield firmness, and consider chalking on calmer days if possible.
Frequently Asked Questions (FAQ)
- What type of chalk is best for a baseball field?
Baseball field chalk, typically calcium carbonate or lime, is specifically formulated for dirt and provides bright, durable lines. - How wide should baseball field lines be?
Most field lines, including foul lines and base paths, are typically 2 to 4 inches wide. Batter’s boxes can be wider. - Can I use regular chalk for a baseball field?
It’s not recommended. Regular chalk may not adhere well to dirt and can wash away easily or create a dusty, less defined line. - How do I get really crisp lines?
Crisp lines come from a well-prepared infield (smooth and slightly damp), accurate measuring, using a taut string line as a guide, and a consistent, steady pace with your chalk machine. - How often should a baseball field be chalked?
This depends on usage and weather. For active leagues, weekly or bi-weekly chalking is common. Less frequent use may allow for longer intervals.
Chalking a baseball field is a fundamental skill for anyone involved in maintaining a baseball diamond. By following these steps, paying attention to preparation, and using the right techniques, you can transform an ordinary patch of dirt into a professional-looking playing surface, ready for action. Remember, the details matter, and well-marked lines contribute significantly to the safety and integrity of the game.